
Birthday celebrations are not just about the cake and balloons; they’re also an opportunity to express yourself through your style, and what better way to do that than with fabulous nail art? With so many creative ideas at your fingertips, the possibilities are endless. Whether you want to go for something chic, fun, or even a little whimsical, there’s a birthday nail design that fits your vibe perfectly. Colorful patterns, glittery accents, and unique themes can all come together to create a show-stopping look that coordinates with your birthday outfit. Get ready to celebrate in style as we explore 75 dazzling nail art designs that promise to make a statement on your special day!
Unleash your creativity and get inspired by these fantastic birthday nail art ideas. They’re sure to leave your friends in awe and help you embrace another year of fabulousness!
1. Balloon Bliss

Imagine tiny balloons floating across your nails, each one painted in a different pastel color. This design captures the joy and excitement of a birthday celebration. Use soft pinks, blues, and yellows to create a cheerful atmosphere. The balloons can be accentuated with tiny white highlights to add a 3D effect, making them look like they are lifting off your nails.
To achieve this, start with a base coat of soft blue. When that dries, use a dotting tool to create balloon shapes with your chosen colors. Finish off with a clear top coat for a glossy shine. This design is not only playful but also easy enough for anyone to replicate at home!
Use a fine brush for the string details and don’t forget to clean up any excess polish around your cuticles for a polished look.
The balloon design can be customized to reflect your age by adding the number balloons to the mix.
2. Glitter Galore

If you’re looking to sparkle and shine on your birthday, this glitter nail art design is perfect for you! Combine a solid base color like deep purple or midnight blue with chunky glitter on top for that extra glam factor. The contrast between the smooth base and the textured glitter creates an eye-catching effect that will surely turn heads.
To apply this look, start with two coats of your chosen base color. While it’s still wet, sprinkle chunky glitter on the tips of your nails, gently pressing it down to adhere. Seal it all with a clear top coat for durability and shine.
Consider using glitter that matches your party theme for a cohesive look. Also, try doing an ombre effect by blending glitter from the tips to the base.
Mix different sizes of glitter for a dynamic depth that is sure to capture light beautifully.
3. Confetti Fun

Bring the party right onto your fingertips with a confetti-inspired nail art design! This fun and festive look is perfect for a birthday bash, incorporating a variety of colors in a playful, scattered pattern. You can go wild with colors, using bright reds, yellows, greens, and blues.
Start with a nude base coat for an elegant touch. Then, using a dotting tool or a small brush, randomly apply small dots of color across your nails, mimicking the look of confetti. For an added touch, you can layer on a glitter topcoat for even more sparkle.
Keep the dots small and varied in size for a more authentic confetti look. Using a matte top coat can also give it a unique twist.
This design allows for endless creativity, so you can easily switch out colors to match your outfit or party theme!
4. Chic Floral

For those who appreciate a more sophisticated nail art style, floral designs are a timeless choice. Delicate flowers painted on a soft background evoke a sense of elegance and beauty suitable for a birthday celebration. Choose your favorite blooms, whether they be roses, daisies, or wildflowers.
Begin with a light pastel base—think lavender or mint green. Once that’s dried, use a fine brush to paint small flowers in contrasting colors. Add tiny dots or leaves around them for a complete look. Finish it off with a shiny topcoat to keep those flowers vibrant.
Try to create a little asymmetry in your design; this gives an organic feel and makes it look more natural.
You can modify the flower colors based on your birth month’s flower for a personal touch!
5. Birthday Cake Delight

What better way to celebrate your birthday than with a cake design on your nails? Capture the essence of your favorite birthday cake by painting tiny layers of sponge, icing, and sprinkles on your fingertips. This design is both fun and festive, making it ideal for a birthday celebration!
Choose a pastel base like soft pink for an icing effect. Use a fine brush to paint layers of your cake from the cuticle up, adding colorful sprinkles on top. Seal the design with a top coat for a traditional cake shine.
If you’re not confident in your painting skills, consider using nail stickers for the cake details.
You can even personalize the cake design by mimicking your actual birthday cake’s colors and toppings!
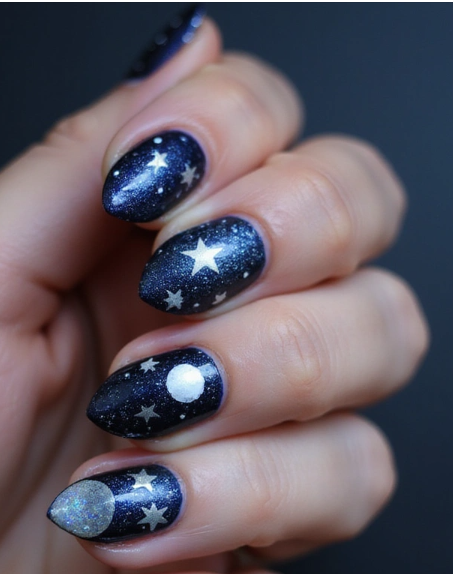
6. Starry Night

Transform your nails into a stunning night sky with the starry night nail art design. This dreamy look is perfect for a birthday bash under the stars. Using dark blues and blacks as your base creates the perfect backdrop for tiny stars and moons.
Start with a deep navy blue base. After it dries, use a thin brush or a dotting tool to add stars in white or gold. Consider adding a crescent moon on one or two nails for an extra celestial effect. Seal everything with a glossy top coat for a mysterious glow.
Using glow-in-the-dark polish for the stars can add a fun surprise once the lights go out at your party!
You can play with gradients by mixing the blue with a hint of purple or black for more depth in the night sky.
7. Ombre Elegance

An ombre nail design is not only trendy but also effortlessly chic. This style fades from one color to another, creating a modern and sleek look that’s perfect for any birthday celebration. You can choose a combination that matches your birthday outfit or go for classic colors like pink to white.
To create this effect, start with a base coat and let it dry. Then, using a makeup sponge, dab on the first color on the tips and blend it into the second color towards the cuticle. Finish with a top coat for a smooth transition.
Experiment with bold color combinations like orange to yellow for a sunset vibe, or blues for an ocean feel.
Adding a touch of glitter to the tips can elevate this design to a more festive level, perfect for a birthday celebration!
8. Rainbow Dreams

Brighten up your birthday with a rainbow-inspired nail art design! This playful pattern brings joy and color to your fingertips, perfect for a day of celebration. Incorporate bold colors like red, orange, yellow, green, blue, and purple to create a vivid rainbow effect.
Start with a clear or white base coat. Using a thin nail brush, carefully paint stripes of color across each nail in order from red to violet. Alternatively, you can opt for a rainbow gradient for a softer look. Finish with a shiny top coat for a polished finish.
Use tape to create straight lines between colors for a cleaner appearance.
Consider adding small cloud designs at the tips for a whimsical touch!
9. Geometric Glam

If you love clean lines and modern designs, geometric nail art is the perfect choice for your birthday. This style often features bold shapes, lines, and contrasting colors to create striking visuals. You can customize it with colors that suit your personality or party theme.
Begin with a solid base color and let it dry. Then, using tape or a nail art brush, create geometric shapes like triangles, squares, and lines in contrasting colors. Finish with a top coat for durability and shine.
Keep your shapes simple for ease of application and maximum impact.
This design allows for significant personalization; you can replace lines with dots or even ombre effects between geometric shapes.
10. Sparkly Unicorn

Capture the whimsical spirit of unicorns with a sparkly unicorn nail art design! This imaginative look uses pastel colors and glitter to create a magical vibe that’s perfect for birthday celebrations. Think soft pinks, purples, and blues with a sprinkling of iridescent glitter.
Start with a base coat of pastel white or pink. After it’s dry, apply a gradient of colors to create the mane effect. Use a sponge to dab on the colors, and then finish off with a glitter top coat to add that unicorn sparkle.
Use a fine brush to draw tiny unicorn heads or silhouettes on a few nails for an added touch of fun.
This design can also incorporate patterns like stars and hearts to amplify the magical effect.
11. Heartfelt Love

Celebrate your special day with a heart-themed nail art design that radiates love and happiness. This romantic style is perfect for a birthday filled with affection, whether it’s for yourself or celebrating with loved ones. Choose soft pinks, reds, and whites for your color palette.
Start with a nude or light pink base. Once dry, use a fine brush to paint small hearts on each nail, mixing colors for variety. You can even add a touch of glitter around the hearts for a charming effect.
Keep the hearts simple and varied in size for a more playful look.
Personalize it by painting the initials of your loved ones within the hearts!
12. Ice Cream Dream

Let’s be honest, who doesn’t love ice cream? Celebrate your birthday with a delicious ice cream-themed nail design! This fun look is ideal for summer birthdays when ice cream is the go-to treat. Opt for pastel colors to represent different flavors, like mint green, chocolate brown, and strawberry pink.
Choose a light base color, then paint delicate ice cream cones on a few nails. Use a dotting tool to create the scoop with textured dots, and don’t forget sprinkles! Seal everything with a gloss top coat for that freshly scooped look.
Add a drizzle of ‘syrup’ using a thin brush to make it extra enticing.
You can change flavors with the seasons; use vibrant colors for summer and earthy tones for fall!
13. Sparkling Mermaid

Dive into a mystical look with a sparkling mermaid nail design! Perfect for mermaid lovers, this dreamy aesthetic uses shimmering colors that transition from deep sea blues to shimmering greens and purples. It’s a magical way to accentuate your nails for a birthday celebration.
Begin with a deep blue base. Layer over with a gradient of greens and purples using a makeup sponge to create that iridescent mermaid scale effect. Apply a glittery topcoat for the added splash!
For a more authentic look, consider using nail foils for the scales.
Add tiny seashells or starfish designs on a few accent nails for an extra thematic touch!
14. Polka Dot Party

Nothing says fun like polka dots! A polka dot nail art design is playful and lively, perfect for creating a festive atmosphere on your birthday. You can choose contrasting colors like bright yellow and navy blue or stick with classic black and white.
Start with a solid base color and let it dry. Using a dotting tool, randomly place dots over the surface, varying the size for a playful pop. Finish with a clear topcoat for longevity.
For a modern twist, try using negative space by painting only part of the nail instead of a solid base.
You can create patterns or lines with the dots to give it a more structured look, making it a bit more chic.
15. Crystal Clear

Glitter isn’t the only way to shine on your birthday! Go for a crystal-themed nail art design that’s all about sophistication and elegance. This look involves using clear or nude bases with crystal or diamond-like accents.
Begin with a clear or nude base. Use a nail art brush to paint facets that resemble cut gems using iridescent and metallic polish. Add tiny rhinestones to accentuate the look, giving an illusion of sparkling crystals on your nails.
Place the rhinestones strategically to draw attention to certain areas.
This design can be customized for any color theme, making it versatile for any occasion!
16. Artistic Brushstrokes

If you’re an art lover, why not wear your favorite art styles on your nails? The artistic brushstroke design allows you to showcase your creativity through bold, sweeping strokes of color. It’s perfect for making a unique statement on your birthday!
Choose a solid base color for contrast. Then, using a flat brush, apply various shades in sweeping strokes across the nail. Think abstract art! Finish with a glossy top coat to smooth it all out.
Use colors that resonate with your personality or party theme for a cohesive look.
Try incorporating famous color palettes from your favorite artists for a cultured twist!
17. Shattered Glass

Get edgy with a shattered glass nail design! This stylish look gives a modern twist to your birthday nails with its unique, broken mirror effect. It looks intricate but is surprisingly easy to achieve with nail foil or thin metallic strips.
Choose a dark base color to make the glass effect pop. Apply small pieces of nail foil or strips randomly across the nail to resembled shattered glass. Seal it all with a topcoat for protection.
Use different shapes and sizes of foil for a more dynamic look.
Play around with colors underneath the glass for unexpected color pops!
18. Sweet Pastels

Soft pastel colors are always in style! A sweet pastel nail art design is perfect for any birthday celebration, radiating a cheerful vibe. Embrace shades like baby blue, lavender, peach, and mint green for a soft and inviting look.
Begin with a clear base coat, then use a sponge to dab on various pastel colors to create a gradient effect. Finish with a matte topcoat to soften the look, or a glossy one for a shiny finish.
Experiment with different pastel combinations for unique results!
You can create a soft floral or heart pattern using lighter shades on top of the pastels for added depth.
19. Nature’s Palette

For the nature lovers out there, a nature-themed nail art design is the perfect way to celebrate your birthday. Use earthy tones and create designs inspired by leaves, flowers, and natural landscapes.
Start with a nude or light green base. Paint leaf patterns and flowers using different shades of green and floral colors. Incorporate tiny details like dots or strokes to represent nature’s nuances. Finish with a glossy topcoat to keep it vibrant.
Use a fine brush for precise details.
Customize the colors to reflect your favorite flowers or plants, making it personal!
20. Tropical Vibes

Bring the tropics to your fingertips with a tropical-themed nail art design! This vibrant style is perfect for summer birthdays and features bright, cheerful colors and fun patterns like palm trees and pineapples.
Start with a bright green base and create palm tree silhouettes with dark green polish. Add colorful accents with small pineapple drawings or tropical flowers. Seal with a glossy top coat for that fresh island look.
Use bright yellows and pinks to color in the flowers and fruit, creating a lively vibe.
This design can easily be adapted to match your favorite tropical destination or vacation memories!
21. Galaxy Glam

Take your birthday nails to the next level with a galaxy-themed nail art design! This cosmic look uses deep colors and glitter to create a beautiful representation of the universe on your fingertips. Perfect for those who love stargazing!
Start with a black or deep navy base. Use a sponge to dab on various colors like purple, blue, and pink to create the galaxy effect. Add tiny star stickers or dots for added detail. Finish with a glitter topcoat for that twinkling effect.
Experiment with different color combinations for unique galaxies.
Consider adding a matte topcoat to contrast the glitter for a more modern vibe!
22. Birthday Bling

It’s your birthday; why not celebrate with some bling? A bling nail art design incorporates rhinestones and sparkle to give your nails that ‘wow’ factor. Choose colors that complement each other for a unified look.
Start with a solid base color. While the polish is still wet, place rhinestones along the cuticle or randomly on the nail for a fun design. Seal it all with a topcoat for longevity.
Use a variety of shapes and sizes for an eclectic look.
You can even use your birthstone colors to make the design more personal!
23. Dotted Chevron

Add a fun twist to classic chevron patterns with a dotted chevron nail design! This playful style combines the sharp angles of chevrons with the softness of dots for a whimsical effect. Choose contrasting colors for extra flair.
Begin with a base coat of your choice. Create chevron patterns using tape or a fine brush, then fill in with dots along the edges. Finish with a topcoat for a smooth finish.
Keep the color palette cohesive by using shades of one color or complementary colors.
You can even vary the size of the dots for added depth.
24. Vintage Vibes

Embrace the charm of vintage styles with a retro nail art design. This look can incorporate soft colors and subtle patterns to create a nostalgic vibe that celebrates your special day.
Choose muted colors like dusty rose, soft blue, or cream for your base. Use small flowers, stripes, or polka dots for a vintage effect. Finish with a glossy topcoat to keep it vibrant.
You can use nail stickers for intricate designs if hand-painting is difficult.
Incorporate vintage symbols that mean something to you for a personal touch!
25. The Razzle Dazzle

Bring out your inner diva with a razzle-dazzle nail design! This look focuses on bold colors, glitter, and eye-catching effects that scream fun. Perfect for maximizing your birthday celebration.
Start with a bright base color, then layer on different colored glitters or sequins. Use a fine brush to create fun patterns such as stripes or swirls. Seal it with a glossy topcoat for a shiny finish.
Play with contrasting colors and textures for a unique look.
You can play with color gradients for the glitters and sequins for added depth and interest!
26. Minimalist Magic

Less is often more, and a minimalist nail art design is perfect for a chic birthday look. This style focuses on subtle details and simple designs, creating an elegant impression without being overly flashy.
Choose a nude or pale base color. Incorporate simple lines, dots, or small geometric shapes using contrasting colors. Finish with a matte or glossy topcoat for polish.
Keep the design balanced by only adding details to a few fingertips for a more sophisticated look.
You can easily adapt this style to any occasion, allowing for more personalization based on your outfit or mood!
27. Whimsical Whirls

Let your creativity run wild with a whimsical whirl nail art design! This fun look incorporates swirling patterns and bright colors to create a lively and festive appearance, perfect for a birthday celebration.
Start with a solid base color of your choice. Using a thin brush, create swirling patterns with different colors, letting them intertwine and flow like ribbons. Seal it with a glossy topcoat for a beautiful finish.
Opt for a color palette that reflects your personality or party theme!
Consider using contrasting textures, such as matte and glossy finishes, to enhance the visual appeal.
28. Textured Triumph

For something truly unique, try a textured nail art design! Use different techniques to create a tactile experience on your nails, turning them into a work of art. This birthday design is all about pushing boundaries and having fun!
Choose a base color, then incorporate textures like sand, velvet, or even a 3D element with gems or beads. Seal it all with a topcoat to maintain its durability.
Consider where you want to place textures for the most impact.
You can create a themed textured effect, like a sandy beach or a velvety cake, to reflect your birthday vibe!
29. Artistic Pearls

Elevate your birthday nails with a design that incorporates pearls for a sophisticated touch. This elegant look can be achieved with a simple base coat and pearl accents that add a luxurious feel to your birthday celebration.
Choose a base color like pale pink or soft white. Once dry, use a nail glue to attach faux pearls carefully across your nails. Seal with a topcoat for a longer-lasting finish.
Use varying sizes of pearls to create a more dynamic look.
This design can easily be adjusted for different occasions, and you can even use colored pearls to match your outfit!
30. Neon Nights

If you want your nails to glow, go for a neon night design! This bold look incorporates bright neon colors that truly pop, bringing excitement to your birthday celebration. Perfect for those who love to stand out!
Start with a solid base coat of white or black. Paint vibrant neon colors like hot pink, electric yellow, or green in various patterns—think stripes, swirls or a gradient. Finish with a glossy topcoat to keep colors vivid.
Incorporate glow-in-the-dark elements for a fun surprise after dark!
You can match your neon designs to party decorations for an extra cohesive look!
31. Colorful Plaid

For something a bit more structured, try a colorful plaid nail art design! This unique look combines various colors and patterns to create a fun and festive appearance that stands out during your birthday celebration.
Choose a base color, then use tape to create the plaid pattern. Layer on different colors for the squares and finish with a topcoat for a clean finish.
Use contrasting colors for a bolder look, or pastel shades for a softer effect.
You can customize the plaid colors to reflect your personality or outfit choices!
32. Rustic Charm

If you love the outdoors, a rustic charm nail art design might be just what you’re looking for! This design is inspired by nature, incorporating earthy tones and rustic patterns that reflect your personality while celebrating your birthday.
Choose muted colors like browns, greens, and oranges for your base. Use nail art brushes to create tree bark patterns or subtle leaf designs. Finish with a topcoat for added shine.
Combine with small nature-themed nail art stickers for added detail.
Consider matching your rustic design to your favorite outdoor spots or hikes for even more personalization!
33. Cartoon Cuties

Channel your inner child with a cartoon cuties nail art design! This playful look incorporates cute characters and bright colors, making it perfect for a fun birthday vibe. Ideal for all ages, this nail art brings joy to the celebration!
Start with a light base color and use a fine brush to paint your favorite cartoon characters or motifs on your nails. Get creative with colors and patterns. Finish with a glossy topcoat for a polished look.
Keep the designs fun and lively to invoke nostalgia.
You can rotate characters based on your mood or choose themes based on your favorite shows!
34. Funky Fringes

Add some flair to your birthday nails with funky fringes! This fun design incorporates fringe effects with varying lengths and colors, making your nails stand out at any party.
Choose a solid base color, then layer on a fringe design using tape to create edges that mimic fringe elements. Finish with a glossy topcoat for a polished look.
Try using contrasting colors for the fringe to make it pop more.
Customize the length of the fringe based on your nail length for a unique touch!
35. Twinkling Tinsel

Celebrate your special day with a twinkling tinsel nail art design! This festive look incorporates shiny tinsel-like accents that resemble a party atmosphere, perfect for birthdays filled with joy.
Choose a solid base color to let the tinsel effect shine. Using nail art tape, create sections where you will layer tinsel or glitter for that twinkling effect. Seal with a glossy topcoat to keep everything in place.
Play with colors and sizes of the glitter to add more depth to the design.
Consider matching your tinsel colors to your party decor for a cohesive look!
36. Seasonal Splendor

Celebrate your birthday in accordance with the season by choosing a seasonal splendor nail art design! This approach uses colors and symbols that reflect the current season, making it a fantastic way to embrace your birthday’s unique ambiance.
Choose colors typically associated with the season—like warm reds and oranges for fall, soft pastels for spring, or icy blues for winter. Use simple symbols like leaves, flowers, or snowflakes in your design. Seal with a glossy topcoat for longevity.
You can rotate this design with the seasons to keep it fresh!
Personalize it with symbols that reflect your favorite aspects of the season, such as favorite flowers or activities.
37. Festive Flags

Incorporate a playful element into your birthday nails with a festive flags design! This concept uses bright colors and triangular shapes to create a fun atmosphere, reminiscent of party banners.
Start with a solid base color and create triangular flag shapes going down the center of the nails using tape or a freehand brush. Use contrasting colors for each flag for a vibrant effect. Seal with a glossy topcoat to keep the design intact.
Use various shades of the same color for a harmonious look.
You can personalize it by incorporating colors from your favorite sports team or event!
38. Fluid Art

Dive into creativity with a fluid art nail design! This artistic style involves swirling different colors together to create a marbled effect that evokes a one-of-a-kind feeling—a perfect way to celebrate your birthday!
Choose two or three colors that complement each other. Apply them side by side on your nails and use a toothpick or brush to swirl them together for a fluid look. Finish with a glossy topcoat to enhance the marbling effect.
Experiment with color combinations to find the perfect mix!
You can create a themed look based on colors related to your personality or party decorations.
39. Inverted Hearts

Add a romantic touch to your birthday look with an inverted hearts nail design! This fun twist on heart designs features outlines instead of solid fills, giving a unique and modern touch to the classic heart shape.
Choose a base color like soft pink or white. Use a fine brush to create heart outlines at the tips or along the sides of your nails. Fill in the hearts with contrasting colors for added depth, then finish with a glossy topcoat.
Keep it simple with a monochrome color scheme for an elegant yet playful look.
You can easily adapt this design to include initials or symbols of beloved ones within the hearts!
40. Cosmic Constellations
Elebrate your special day with a cosmic constellations nail art design! This celestial look incorporates stars, moons, and constellations, allowing you to wear a piece of the universe on your fingertips.
Choose a dark base color to allow the stars to pop. Use a fine brush to create constellation patterns in white or gold, complete with tiny dots for stars. Seal with a glossy topcoat for a dreamy finish.
Consider using a dark purple or navy base for added depth.
You can personalize the constellations based on your zodiac sign or favorite celestial patterns!
41. Artistic Doodles

Bring out your playful side with an artistic doodle nail design! This design allows you to express your creativity through whimsical doodles and sketches on your nails. Perfect for showcasing your personality during your birthday celebration!
Choose a nude or pastel base color. Use a fine brush to create simple doodles—think clouds, stars, or smiley faces! Finish with a glossy topcoat to keep the designs intact.
Don’t overthink the doodles; the messier, the better for this casual design!
This design can be a reflection of your favorite hobbies or interests—create doodles that depict what you love!
42. Ombre Shimmer

Elevate your birthday nails with an ombre shimmer design that combines gradients with a touch of sparkle. This look is perfect for adding a soft, dreamy vibe to your birthday celebration while still standing out!
Begin with a clear or nude base. Use a makeup sponge to apply two or more colors in an ombre effect. Finish with a sprinkle of shimmer or glitter at the tips for a twinkling touch.
Choose colors that complement each other well for a harmonious look.
You can customize the shimmer colors to match your outfit or party theme for added cohesion!
43. Hidden Messages

Why not add a fun surprise to your birthday nails with hidden messages? This playful design allows you to incorporate words or symbols that have special meaning to you.
Choose a neutral base color. Use a fine brush to write small messages or symbols on random nails. Cover with a whimsical design for added flair! Seal everything with a glossy topcoat to keep it intact.
Think of short quotes or symbols that resonate with you for a personal touch!
This design can serve as a conversation starter or a fun surprise for friends when they notice the hidden messages!
44. Mesmerizing Marbling

Take your birthday nails to the next level with a mesmerizing marbled design! This artistic look evokes the elegance of marbled stone, perfect for those who appreciate a refined style.
Choose two or three colors that contrast well. Use a toothpick to swirl them together on your nails, creating a beautiful marbled effect. Finish with a glossy topcoat to enhance the look.
Experiment with different color combinations to find your favorite marble look.
You can draw inspiration from natural stones you love for a personalized effect!
45. Elevated Elegance

If you want to keep it classy, an elevated elegance nail design is just what you need for your birthday! This sophisticated look combines soft colors and subtle patterns for a refined appearance.
Choose a soft base color, then gently brush on delicate designs like lace or floral patterns using a fine brush. Seal everything with a glossy topcoat for a polished look.
Stick to monochromatic colors or soft pastels for an elegant vibe.
Consider adding a touch of metallic accents for a luxurious finish!
46. Time to Shine

Let your birthday nails sparkle with a time to shine design that focuses on glitter and shine! This fabulous look will make you feel like a star, perfect for your special day.
Begin with a solid base color and add glitter polish either to the tips or all over for a dazzling effect. Seal with a glossy topcoat to keep everything shiny.
Use different sizes of glitter for added depth and interest.
You can personalize this design with colors that correspond to your favorite outfits or event themes!
47. Burst of Joy

Spread happiness with a burst of joy nail design that incorporates bright colors and cheerful patterns! This playful concept is perfect for celebrating your birthday in style and bringing a smile to those around you.
Choose a light base color. Using a fine brush, create fun patterns like sunshine or rainbows across your nails with a variety of bright colors. Seal with a glossy topcoat to make it vibrant.
Keep it playful; don’t worry about making it perfect!
You can draw inspiration from your favorite cartoons or childhood memories for added fun!
48. Playful Patterns

Bring on the fun with a playful patterns nail art design! This look incorporates various patterns like stripes, polka dots, and zigzags, offering a whimsical touch to your birthday nails.
Choose a light base color to let the vibrant patterns stand out. Create different sections on each nail for varied patterns, sealing everything with a glossy topcoat for a polished finish.
Keep the colors bright and cheerful for a party-ready vibe.
You can choose patterns that reflect your personality or interests for a truly unique touch!
49. Sweet Treats

Celebrate with sweet treats on your nails! This fun nail art design incorporates candy-inspired colors and dessert motifs, making it the perfect complement to your birthday festivities.
Choose a light base color, then paint small treats like cupcakes, candies, and lollipops on each nail. Finish with a glossy topcoat for a delicious look!
Keep the designs cute and simple for a playful effect.
You can use your favorite dessert items to personalize the design!
50. Dreamcatcher Delight
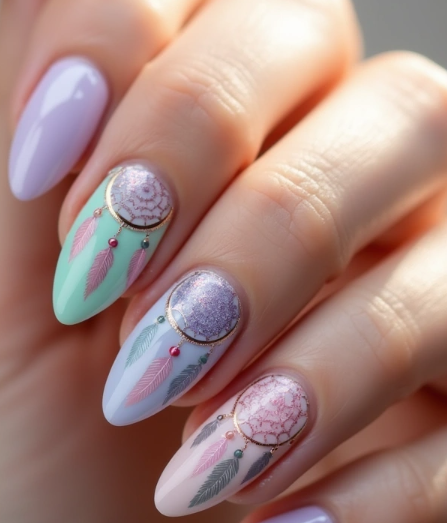
Capture good vibes with a dreamcatcher delight nail art design! This enchanting look features a dreamcatcher motif in soft colors, perfect for celebrating your birthday while embracing positive energy.
Choose a pastel base color. Use a fine brush to paint intricate dreamcatchers with feathers and beads on some nails. Seal it all with a glossy topcoat for a polished look!
Combine with other elements like stars or moons for added charm.
You can personalize the colors to reflect your spiritual beliefs or personal symbolism!
Conclusion

With these 50 stunning birthday nail art designs, your special day is sure to shine brighter than ever! From playful themes to elegant styles, there’s no shortage of creativity when it comes to celebrating. Remember, your nails are the perfect canvas to express your personality and style, making your birthday memorable.
So, gather your favorite colors, get inspired, and start painting your way to fabulous nails. Don’t forget to share your creations and spread the joy of birthday nail art with others!